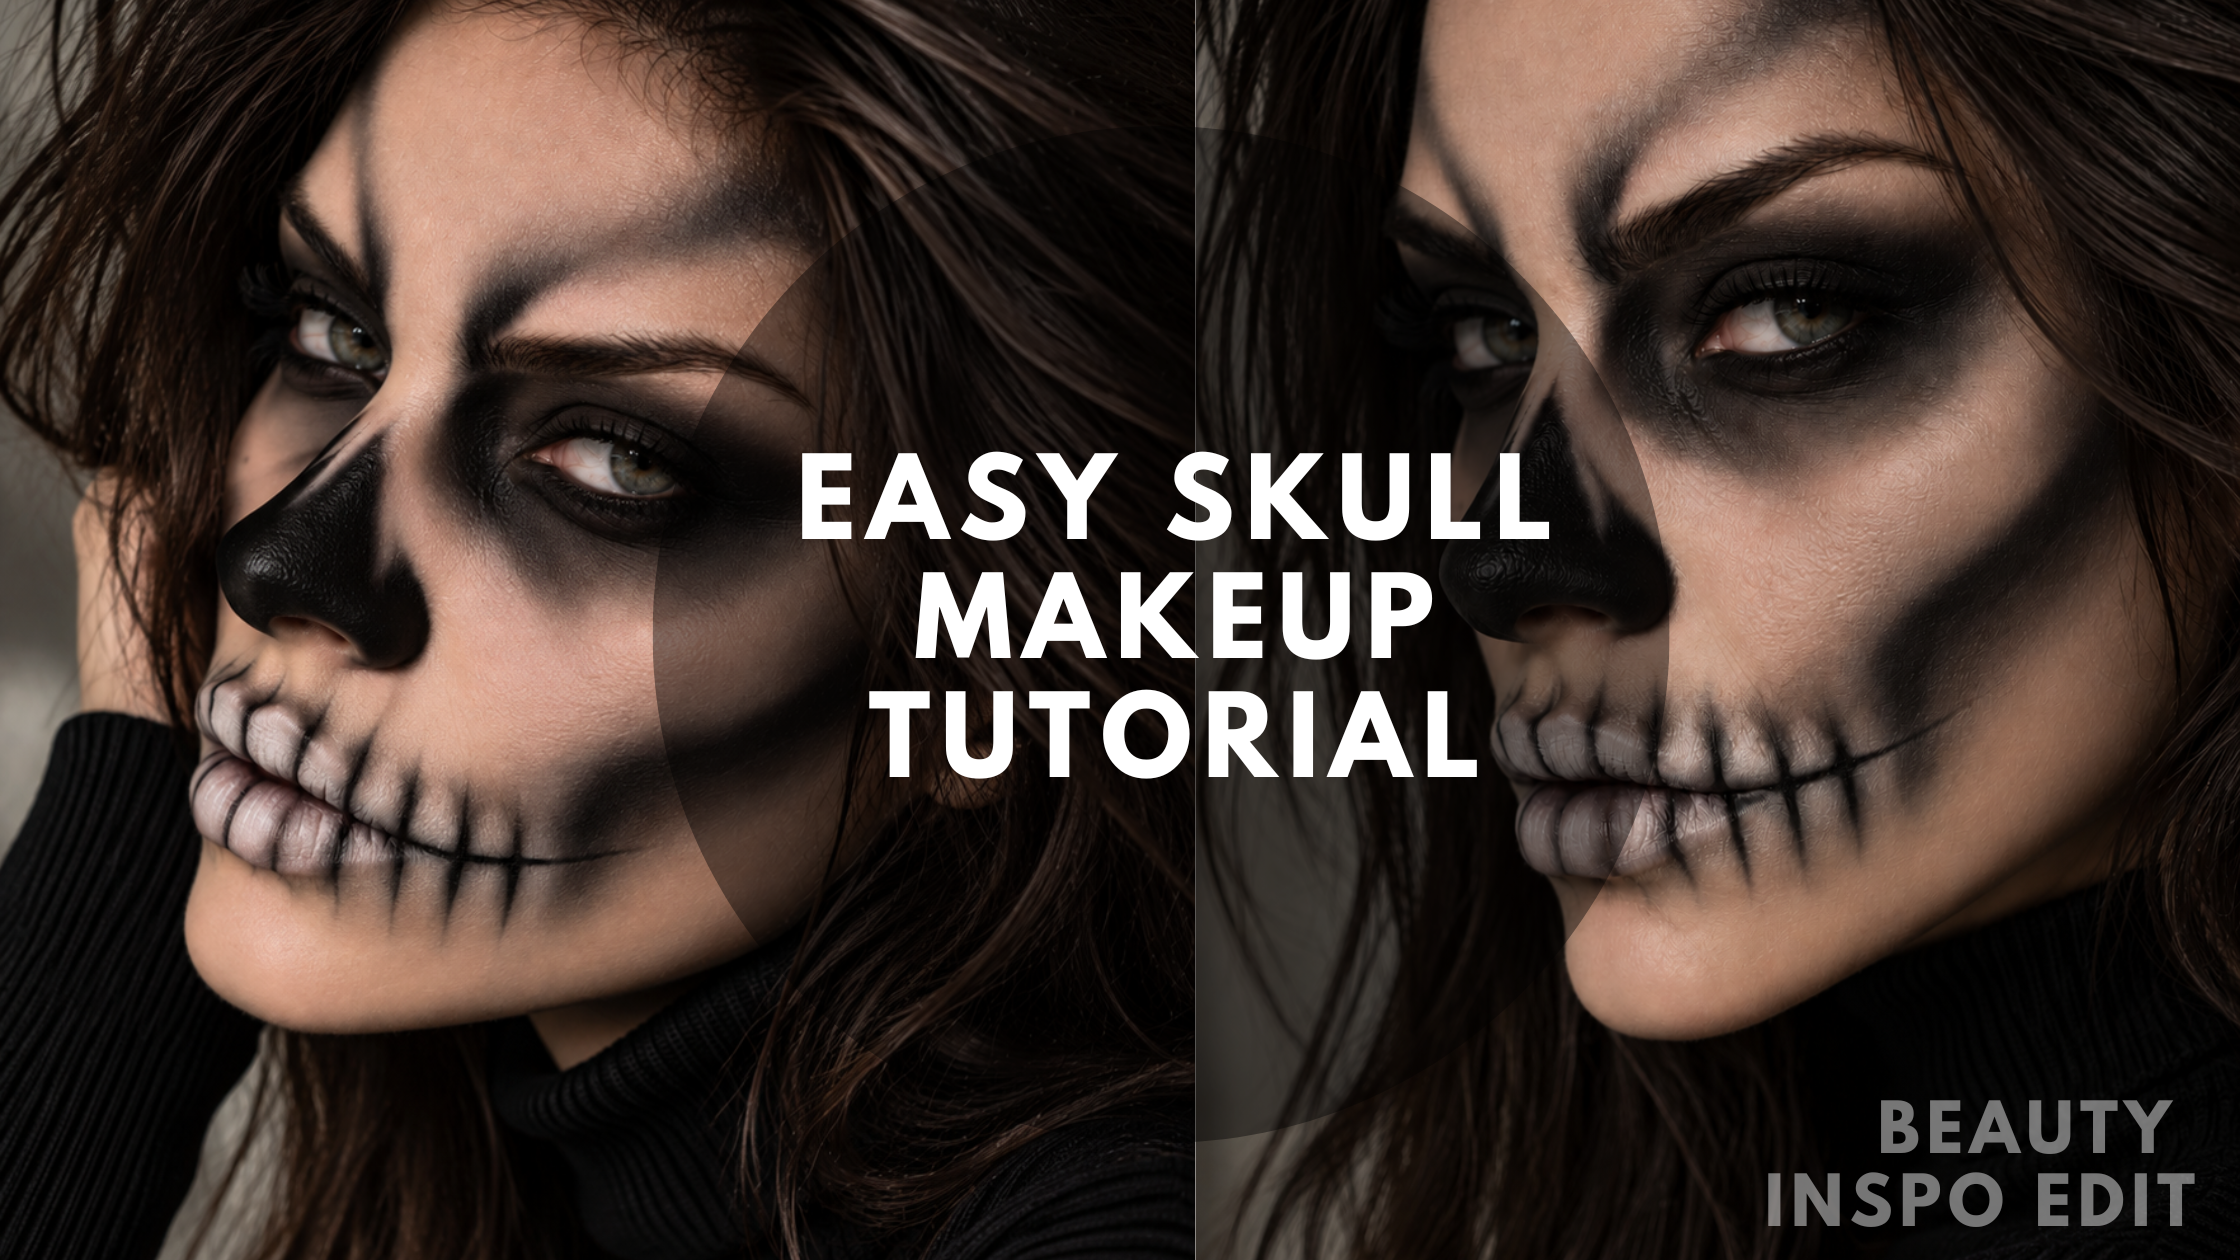

If you love Halloween makeup that looks dramatic but is actually fairly simple to break down, this skull makeup look is a great one to try. Instead of trying to create the entire skull at once, we’re building the look gradually using a pale base, cool-toned contour, smoky black eyes and a simple painted teeth technique.The key is layering. Start softly, map out where everything will go, and deepen the makeup as you work. You don’t need every line to be perfectly symmetrical either. The shadows and blending at the end are what bring everything together and give the skull its dimension.
Here’s how to recreate the look step by step.
Begin with clean, moisturized skin. Since we’ll be layering quite a bit of makeup, you want the complexion to be hydrated and smooth before applying your base. You can use a lightweight primer if you normally wear one, especially around areas where makeup tends to separate. Keep the brows and lips completely natural for now.

Step 1: Create a Pale, Even Base
Instead of using stark white face paint, choose a foundation or complexion product slightly lighter than your natural skin tone. Apply it evenly over the entire face, including over the lips. You want the complexion to look noticeably paler, but still like skin. Use a little extra coverage where necessary so you have a clean canvas for the skull makeup. Lightly set the complexion with translucent powder if you need additional staying power.
Tip: Avoid making the base completely white. Keeping some natural skin tone showing makes the finished skull look softer, more dimensional and much more wearable.

Step 2: Map Out the Skull With Gray Contour
Before reaching for black, use a cool gray or charcoal eyeshadow to map out the structure of the skull. Start by adding shadow around the temples and underneath the cheekbones. Bring the cheek contour inward toward the corners of the mouth to create that hollowed out appearance. Add subtle gray shading around the eye sockets and along the sides of the nose as well. Keep everything soft and blended at this point. Think of this step as creating a blueprint for the darker makeup that comes later.

Step 3: Create the Hollow Eye Sockets
Now we can begin adding more drama. Using a matte black or very dark charcoal eyeshadow, deepen the entire eye area. Blend the colour across the eyelids, through the crease and underneath the lower lash line. Extend the shadow slightly toward the brows and outward toward the temples. The darkest colour should remain closest to the eyes, while the outer edges gradually fade into the gray contour from Step 3. Don’t worry about making the eyes extremely black yet. We’ll deepen everything again during the final steps.

Step 4: Paint the Skeletal Nose
Next, create the skull’s nasal cavity. Using black face paint, gel liner or a highly pigmented black cream product, begin covering the tip of the nose and around the nostrils. Bring the shape slightly upward along the sides of the nose, creating an elongated skeletal shape. Keep the bridge of the nose lighter. That contrast between the pale bridge and black tip is what creates the illusion of the nose disappearing into the skull. You can soften the upper edges with a little charcoal shadow so the black doesn’t suddenly stop.

Step 5: Cover the Lips and Draw the Mouth Line
Now we can start constructing the skeletal mouth. First, cover your natural lip colour using the same pale complexion product you used for your base. The goal is to make the lips blend into the surrounding skin. Next, use a thin brush and black cream product or eyeliner to draw a line directly through the natural opening of the mouth. Extend the line slightly beyond both corners of your lips toward the cheek contour. Keep this first line fairly thin. It will act as the guide for everything we add next.

Step 6: Map Out the Teeth
Using the horizontal mouth line as your guide, begin drawing thin vertical lines across the upper and lower lips. These lines will determine the placement of each individual tooth. Start in the centre of the mouth and work outward. Make the central teeth slightly larger and gradually shorten the lines as you move toward the outer corners. Continue a few of the tooth markings beyond the natural lips so the skeletal mouth appears wider than your actual mouth. Don’t worry about making them perfect. At this stage, we’re simply creating the outline.

Step 7: Fill In the Teeth
Once you’re happy with your tooth placement, begin filling each section with an off white or ivory cream product. Avoid using an extremely bright white if you want a softer, more realistic skull effect. Use a small detail brush and carefully fill between the black guidelines while leaving the separation lines visible. You can slightly round the top and bottom of each section to create more recognizable tooth shapes. Again, perfection isn’t necessary. Once we add the shadows, all of these individual pieces will begin to blend together.

Step 8: Add Depth Around the Mouth
This is where the painted teeth really start looking three dimensional. Deepen the black line running through the centre of the mouth and darken the spaces between each tooth. Next, use a small blending brush with charcoal or black eyeshadow to softly shade around the edges of the teeth. Concentrate the deepest shadow around the corners of the mouth and gradually blend it into the hollowed cheek contour. You can also add subtle gray shading around individual teeth to make the lighter centres stand out. The goal isn’t to cover the teeth with black. You’re creating shadow around them, which makes them appear more dimensional.

Step 9: Deepen, Blend and Add the Final Details
Now look at the entire face and start intensifying everything. Deepen the black around the eye sockets, concentrating the pigment close to the lash lines and blending outward. Add black liner and dramatic lashes if you want a more glamorous finish. Intensify the skeletal nose and refine its edges. Go back into the cheek hollows with charcoal and black shadow, making the deepest portion darker while keeping the outer edges smoky.
Finally, revisit the mouth. Strengthen the black separations between the teeth, deepen the corners and softly blend the surrounding shadows until the teeth, cheeks and jaw feel connected. This final layering is what transforms all of those individual tutorial steps into one cohesive skull.

The Finished Skull Makeup
Once everything is blended, you should still be able to see several different levels of depth: pale areas representing bone, soft gray transition areas and deep black hollows around the eyes, nose, cheeks and mouth. And that’s really the secret to this look. You don’t have to be an experienced special-effects makeup artist or attempt to paint a perfect skull in one sitting. Breaking the makeup into smaller sections makes it much easier to recreate: build the base, map the shadows, deepen the hollows, construct the teeth and then add contrast at the end.
If something looks a little uneven along the way, don’t immediately erase it. Keep blending and building. Skull makeup actually benefits from slightly imperfect shadows and texture because they help create that eerie, dimensional finish. Whether you’re recreating this for a Halloween party, costume, photoshoot or just experimenting with Halloween makeup at home, take your time with each layer, and save the darkest black for the very end.